MAY 2022
The ZWO ASIAIR Plus
[This is just one of many articles in the author’s Astronomy Digest.]
ZWO sell many of the now available CMOS astro imagingcameras and, in 2018, produced the original ASIAIR device to greatly aid thetaking of astronomical photographs: enabling one to easily polar align themount, assistance with focussing the camera, finding deep sky objects, auto guidingand, if desired, “live stacking” of the object being imaged. Since then, two upgrades to the original havebeen made in the ASIAIR Pro and, most recently, the ASIAIR Plus.
These are all controlled over WiFi using an Apple or Androidtablet or smartphone and the major advantage of the Plus version over the Proversion is that it has an external antenna giving it a far greater WiFi range (around20 m) so this is, perhaps, the version to buy, costing just under £300. However the WiFI range of the two earlierversions can be greatly extended with the use of a “Netgear Booster Rangeextender” which costs just £20. Theycan be used with the ZWO cameras or a wide range of Canon or Nikoncameras. Controlled using a tablet orsmartphone, it removes the requirement of having a laptop adjacent to the mountwith, perhaps, three USB cables coupled to the mount, imaging and guide cameras.[I have run into trouble when the mount has done an unexpected meridian flip.]
Data Storage
The ASIAIR Plus contains a 32 Gbyte memory which allows for20 Gbyte of user images and is also includes a micro SD card port, allowing SDcards of up to 64 Gbyte in memory size to be added, making it very easy to portthe captured images or video sequences over to an image processing computer.
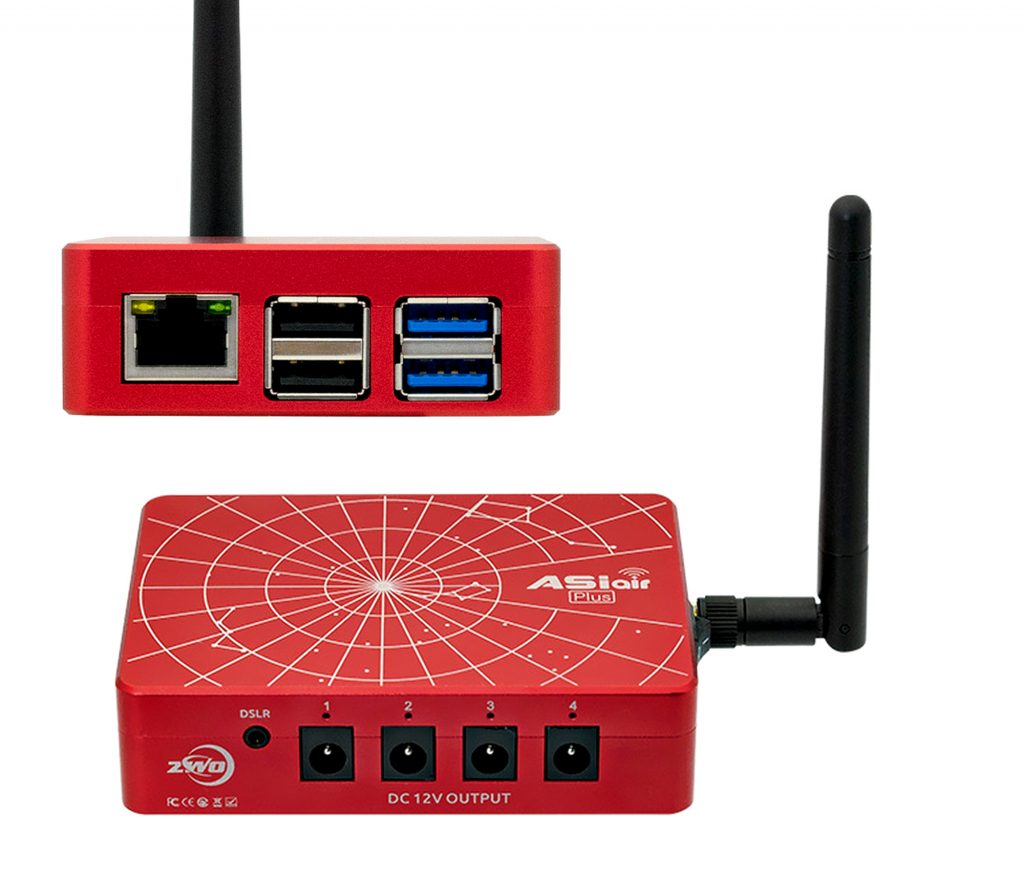
Ports
As seen in the image above, the ASIAIR Plus has two USB3ports to connect to the imaging and guide cameras, and two USB2 ports forcontrolling, for example, a focuser and filter wheel. There is also a DSLR shutter release port usedto initiate exposures if one is to be used.
Power
The ASIAIR Plus accepts a 12 volt power cable but then, asagain seen in the image above, provides four 12 volt outputs having a totalcapacity of 6 amps which can be used, for example, to power the mount, thecamera’s cooling system and dew heaters, making for a far neater imaging setupwith no fears of meridian flips.
Control
Control is usually carried out over WiFi, but there is anethernet port so it may be hardwired to the user’s WiFi router.
Astro Imaging
Having first taken some test exposures and approximatelyfocussing the camera, the ASIAIR Plus takes one through each aspect of settingup a mount and camera and the taking of astro images
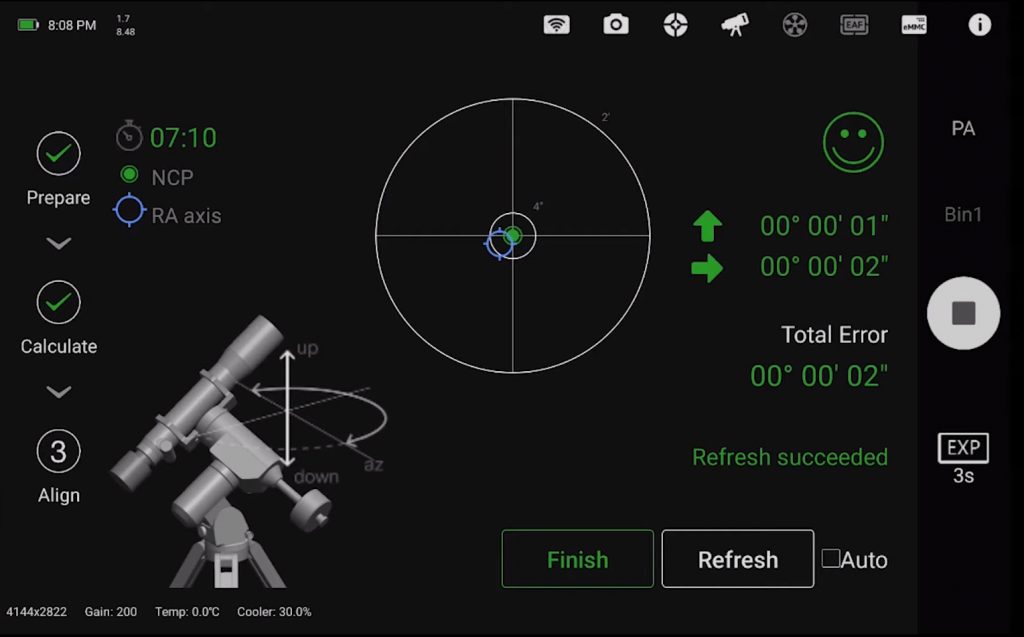
Polar Alignment
The mount is first approximately polar aligned and thealignment sequence initiated. Thecamera’s exposure is set so that at least 20 stars are visible and an image istaken which is “plate solved”. The mount is then automatically slewed in Right Ascension by 90 degreesand a second image taken and plate solved. From these two images the telescope pointing is determined and thedisplay shows the position of the RA axis on the sky as well as the position ofthe North Celestial Pole. Small adjustmentsto the mount’s azimuth and elevation are then made, each time taking a further,plate solved, image until the polar alignment is sufficiently accurate as seenbelow.
Accurate Focus
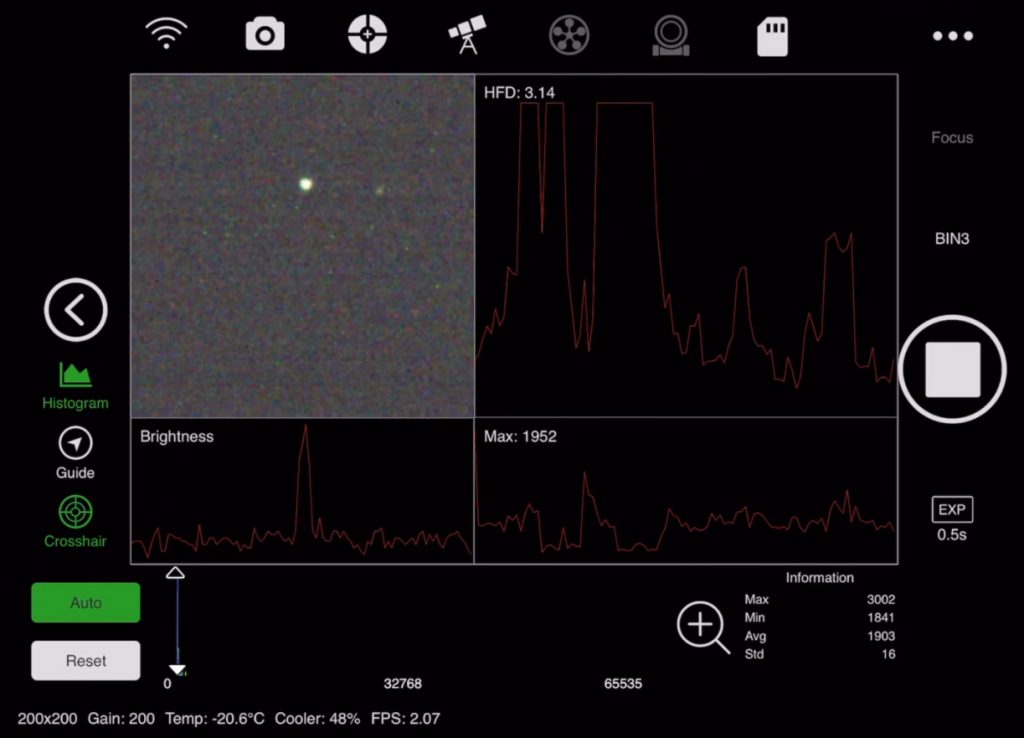
An image of the sky is taken with an exposure to find areasonable number of stars (a high “gain” or “ISO” can beused so that the exposures are short). In the focus tool, a green box can be placed around a suitable star and,as this area is “zoomed” into, a graph shown below will then show the“Half Flux Diameter” – ameasure of the focus accuracy – as this is minimised by adjusting the focuser. [Alternatively, one could simply “Goto”a bright star and use a “Bahtinov Mask” to set accurate focus.]
Moving to an object
There is no need to spend time “aligning” themount. One simply asks the ASIAIR Plusto Goto an object. Dependent on themount’s Goto ability, the object will probably not be in the field ofview. When the target area is reached,ASIAIR PRO will automatically plate solve and adjust the mounts position tocentre the target in the field of view – effectively having done a “onestarfield” alignment very close to the objects position.
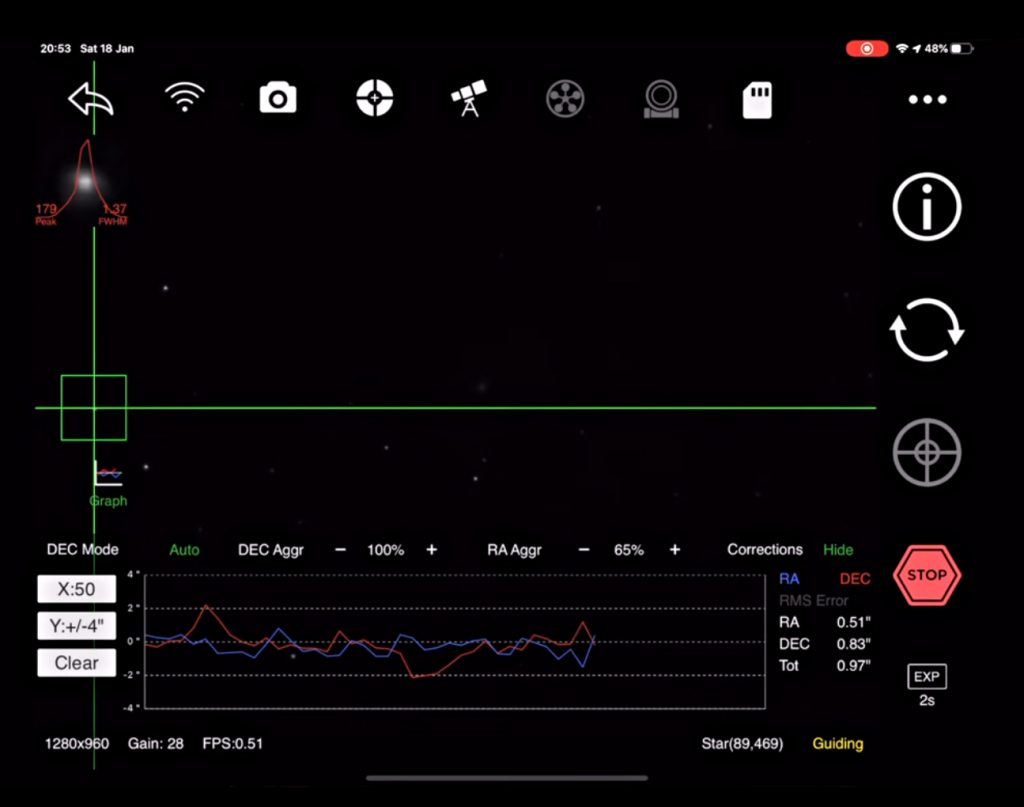
Autoguiding
Should a guide scope and camera be employed, having selecteda suitable star (which is not over exposed) the ASIAIR Plus will use itsguiding software to first calibrate the mount’s RA and Dec movements and thenguide the star in very similar way to Stark Labs, PHD (Push Here Dummy) guidingsoftware.
Normal Imaging
This is achieved by using the “Imaging Plan” whichallow one to set a sequence of exposures defining the exposure length and“binning” mode of the light frames and, if desired, the taking ofcalibration frames such as “dark” and “flat” frames.
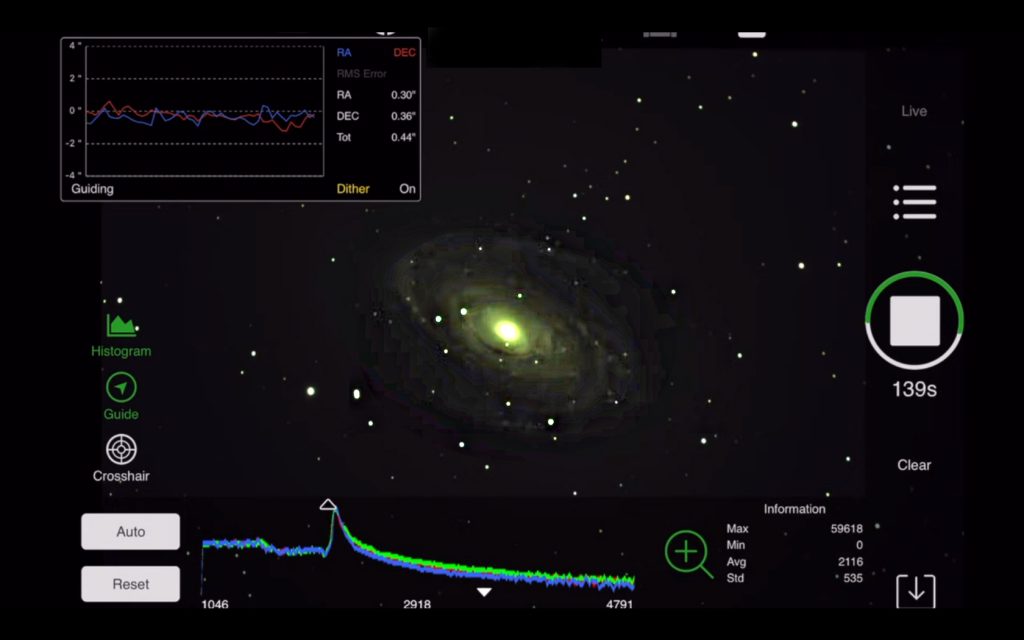
Live View Imaging
This is the automated aligning and stacking of multipleimages in real time – great for showing faint objects to friends and family orfor use at star parties. Having moved toa target object and taken test images to suitably align on the object, the “LiveStacking Mode” is selected, “Light Frames” are chosen and anappropriate exposure selected before initiating the process – when the selectedobject will magically integrate out of the noise. It is also possible to save each frame forlater post processing if desired. Moreadvanced users can incorporate the use of a pre-made “master dark”and “flat” frames. The imagebelow shows the result of live stacking an image of M81, Bodes Galaxy.
Planetary Imaging
The ASIAIR Plus (and Pro) includes a video mode for using“lucky imaging” to photograph the planets. In preview mode, once targeted and focussed,it enables one to adjust the white balance, gain and exposure whilst viewingthe live video feed and displaying a histogram graph. One can then reduce the area of the camera’s sensorthat is employed, centring the planet each time, and so reduce the size of thevideo file that will be captured. Theresulting .avi file is then saved to the SD card for later processing.
Two excellent video tutorials describing in detail how toset up and use the ASIAIR Plus are: